Text File Output
Last updated
Last updated
Steel Wheels wants to send out a survey to its customers, based on a list of questions.
In this Lab, you will configure the following steps:
• Get System Info
• User Defined Java Expression
• Data Grid
• Append
• Select Values
• Text File Output
In Spoon, click File > New > Transformation:
Any one of these actions opens a new Transformation tab for you to begin designing your transformation.
By clicking New, then Transformation
By using the CTRL-N hot key
The Get System Info step retrieves information from the Kettle environment. This step generates a single row with the fields containing the requested information. It also accepts input rows. The selected values are added to the rows found in the input stream(s).
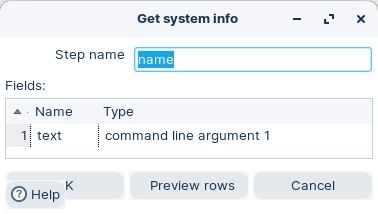
We will use this step to input the Customer Name as an argument.
Drag the ‘Get System Info’ onto the canvas:
Double-click on the step, and configure the following properties:
Click OK.
This step allows you to enter User Defined Java Expressions as a basis for the calculation of new values. In this example, a user defined java expression is used to update the ‘text’ stream field with the Customer Name.
Drag the ‘User Defined Java Expression’ onto the canvas.
Create a hop from the ‘name’ step.
Double-click the step, and configure the following properties:
Close the Step.
Replaces the previous ‘text’ stream field (Argument value) with concatenation of Customer name + Argument value.
The Data Grid step allows you to enter a static list of rows in a grid. This is usually done for testing, reference or demo purposes.
• Meta tab: on this tab, you can specify the field metadata (output specification) of the data
• Data tab: This grid contains the data. Everything is entered in String format so make sure you use the correct format masks in the metadata tab.
We’re going to use this step to define the top section - head – of the survey.
Drag a ‘Data Grid’ step onto the canvas.
Double-click the step, and configure the following properties:
Close the Step.
This step type allows you to order the rows of two inputs hops. First, all the rows of the "Head hop" will be read and output, after that all the rows of the "Tail hop" will be written to the output.
If more than 2 hops need to be used, you can use multiple append steps in sequence. As always, the row layout for the input data coming from both steps must be identical: the same row lengths, the same data types, the same fields at the same field indexes in the row.
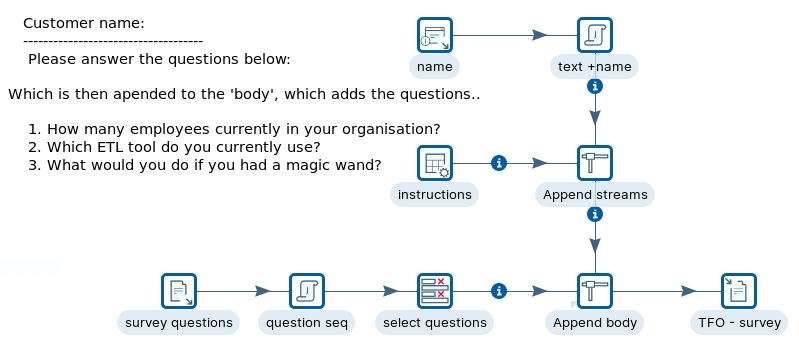
In our example, the Head hop ‘text + name’ is appended to the Tail hop, ‘questions’.
Drag the ‘Append’ step onto the canvas.
Create hops from the ‘text + name’ and ‘questions’ steps.
Double-click on the step, and configure the following properties:
Close the Step.
• Appends the ‘Tail hop’ - text layout to the ‘Head hop’ - Customer name: ‘name’.
• The trick here is, as the we are appending data streams to keep the stream fields and data type consistent. Each stream must have the same layout and data type: in this case ‘text’ and ‘string’
If you don't care about the order in which the output rows occur, you can use any step to create a union of 2 or more data streams.
The Text File Input step is used to read data from a variety of different text -file types. The most commonly used formats include Comma Separated Values (CSV files) generated by spreadsheets and fixed width flat files.
The Text File Input step provides you with the ability to specify a list of files to read, or a list of directories with wild cards in the form of regular expressions. In addition, you can accept filenames from a previous step making filename handling more even more generic.
Part II – the main objective is to append the questions.txt to the ‘head’ stream.
Drag the ‘Text File Input’ step onto the canvas.
Double-click on the step, and configure with the following properties:
File: ${Internal.Entry.Current.Directory}/questions.txt
💡TAB as delimiter
💡Uses row numbers as question numbers.
Rename the stream field: text
Close the Step.
The questions are now associated with ‘text’ stream field, with each record numbered by the rownum fieldname: question_num.
This step allows you to enter User Defined Java Expressions as a basis for the calculation of new values.
In this example, a user defined java expression is used to update the ‘text’ stream field with the ‘question_num’.
Drag the ‘User Defined Java Expression’ onto the canvas.
Create a hop from the ‘survey questions’ step.
Double-click the step, and configure the following properties:
Close the Step.
Adds question_num (question numbers) to the ‘text’ stream field
The Select Values step is useful for selecting, removing, renaming, changing data types and configuring the length and precision of the fields on the stream.
These operations are organized into different categories:
• Select and Alter — Specify the exact order and name in which the fields should be placed in the output rows
• Remove — Specify the fields that should be removed from the output rows
• Meta-data - Change the name, type, length and precision (the metadata) of one or more fields
Drag the Select values step onto the canvas.
Create a hop from the ‘question seq’ step.
Double-click on the step, and configure the following properties:
Close the Step.
The reason why you need a ‘Select values’ step is to select the correct data stream field - text- that will be appended to the ‘Body’ stream.
Currently there are two stream fields:
• question_num - coming from the Text File Input - survey questions
• text – the main datastream field.
This step type allows you to order the rows of two inputs hops. First, all the rows of the "Head hop" will be read and output, after that all the rows of the "Tail hop" will be written to the output.
If more than 2 hops need to be used, you can use multiple append steps in sequence.
In our example, the Head hop ‘Append head’ is appended to the Tail hop, ‘select questions’.
Drag the ‘Append Streams’ step onto the canvas.
Create hops from the ‘Append head’ and ‘select questions’ steps.
Double-click on the step, and configure the following properties:
Close the Step.
The two data streams are now appended under one data stream field: text
The Text file output step is used to export data to text file format. This is commonly used to generate Comma Separated Values (CSV files) that can be read by spreadsheet applications.
It is also possible to generate fixed width files by setting lengths on the fields in the fields tab.
It is not possible to execute this step in parallel to write to the same file. In this case, you need to set the option "Include stepnr in filename" and later merge the files.
Drag the ‘Text File Output’ step onto the canvas.
Create a hop from the ‘Append body’ step.
Double-click on the step, and configure the following properties:
File: ${Internal.Entry.Current.Directory}/survey
Click on the Field tab, and click on the ‘Get Fields’ button.
Close Step.
Click the Run Options button in the Canvas Toolbar.
Click on Arguments (legacy) and enter a customer name.
Click OK then Run
Click on the Preview tab.
View the survey.txt file.
This demonstration illustrates the ‘golden rules’ when appending / merging data streams:
They both must have the same layout, i.e. fieldnames in the same order in the data stream
and with the same data type.