
MDI
Overview of Metadata Injection ..
In this Workshop, you will:
• Create a number of transformations that prepare the metadata and inject these specific values through the ETL Metadata Injection step.
Metadata is traditionally defined and configured at design time, in a process known as hard coding, because it does not change at run time.
In this scenario, onboarding the files would require a CSV file input step for each of the different delimiters.
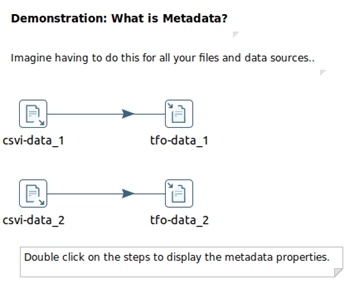
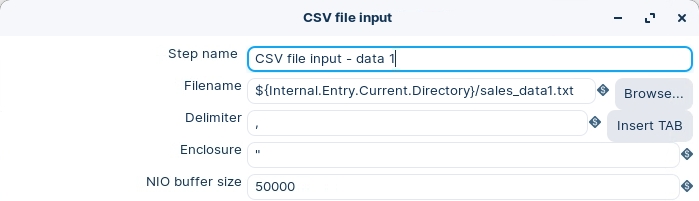
Double-click on the CSV File Input steps to display the metadata properties:
~/How-To--Metadata-Injection/Overview of Metadata Injection/file_hard_coded.ktr

Each data source requires its own workflow.
The challenge becomes to find a way to dynamically inject the required metadata properties at run time via a template.
Metadata Properties
Steps in a Transformation are configured with associated metadata property values, e.g. step name, filename, delimiter, and so on ..
These metadata properties are saved as .ktr=xml
A neat way to introduce metadata injection is to change a metadata property in the xml of a step.
Copy / Paste the step into Visual Studio Code:

Change a metadata property: <name>Whatever</name>
Copy / Paste xml into a new transformation:
Each of the Step 'settings' are defined in the .xml. By changing the step name, you've manually 'injected' a new value.
These Guided Demonstrations outline the ‘Use Case’ for Metadata Injection. Onboarding data workflows follow repeatable patterns, with just different metadata properties.
Standard Metadata Injection – rename data stream fields
Once the repeatable pattern has been defined in a template, the ETL Metadata Injection step exposes their metadata properties, which can then be mapped to the corresponding injected source stream field.
Outline the workflow for standard metadata injection.
Configure an ETL Metadata Injection Transformation, and Template.
A typical Use Case would be renaming database columns, as you migrate databases from one system to another.
Template
Lets start with the template. The template is the workflow that utilizes the metadata injection.
Open the template:
~/How-To--Metadata-Injection/Standard Metadata Injection/standard_template.ktr
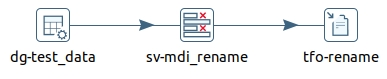
Data Grid – Test data - input
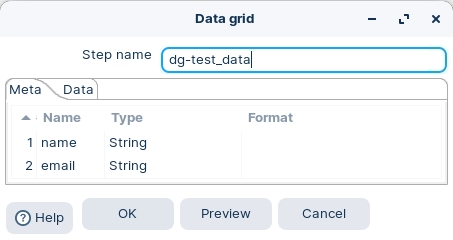
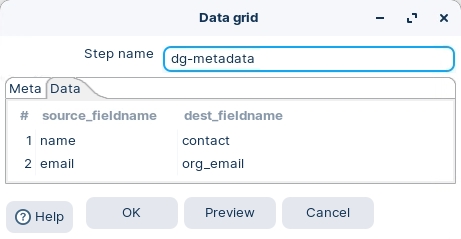
Meta tab: on this tab, you can specify the field metadata (output specification) of the data
Data tab: This grid contains the data. Everything is entered in String format so make sure you use the correct format masks in the metadata tab.
Drag and drop the Data Grid step onto the canvas:
Double-click to set the properties as outlined below:
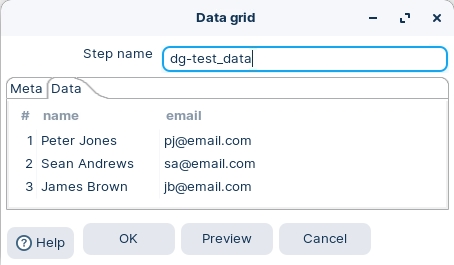
This is the data ingestion step. Could be a table, flat file, etc..
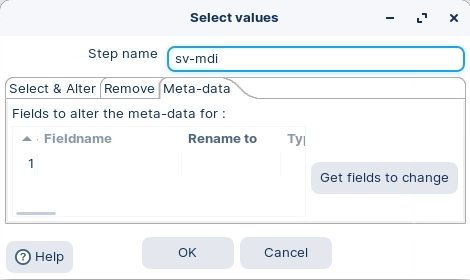
Select Values
Drag the Select values step onto the canvas:
There’s nothing to configure as the ‘metadata rules’ will be defined in the ETL Metadata Injection step.
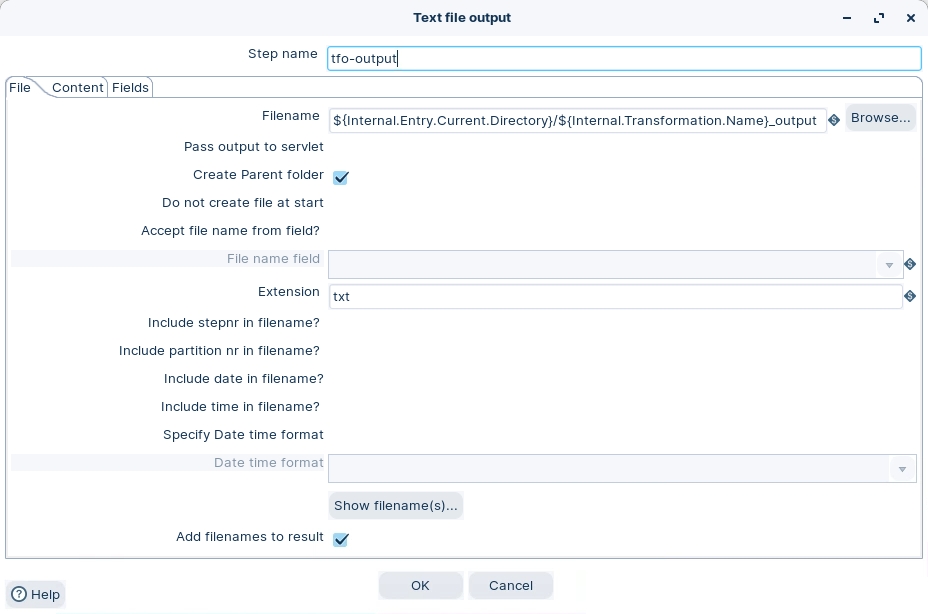
Text File Output
The Text file output step is used to export data to text file format. This is commonly used to generate Comma Separated Values (CSV files) that can be read by spreadsheet applications. It is also possible to generate fixed width files by setting lengths on the fields in the fields tab.
Drag and drop the Text file output step onto the canvas:
Double-click to set the properties as outlined below:

Just add the path to the output file. Notice the internal variables used to define the filename:
Filename: ${Internal.Entry.Current.Directory}/${Internal.Transformation.Name}_output
Save the Transformation as:
~/How-To--Metadata-Injection/Standard Metadata Injection/standard_template.ktr
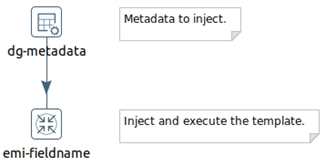
Metadata Injection
The Transformation sets the metadata fieldname values that are going to be used in the Metadata Injection Template.
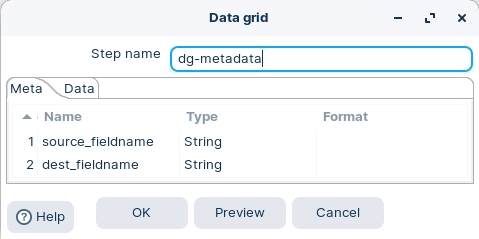
Data Grid
Drag and drop the Data Grid step onto the canvas:
Double-click to set the properties as outlined below:
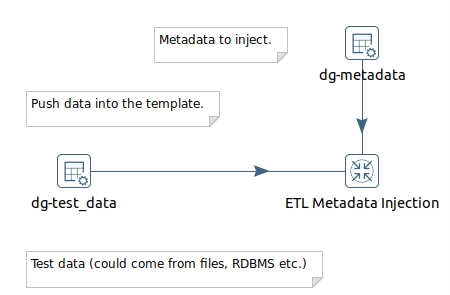
ETL Metadata Injection
The ETL Metadata Injection step inserts metadata into a template transformation. Instead of statically entering ETL Metadata in a step dialog, you pass it at run-time. This step enables you to solve repetitive ETL workloads like loading of text files, data migration, and so on.
Drag and drop the ETL Metadata step onto the canvas:
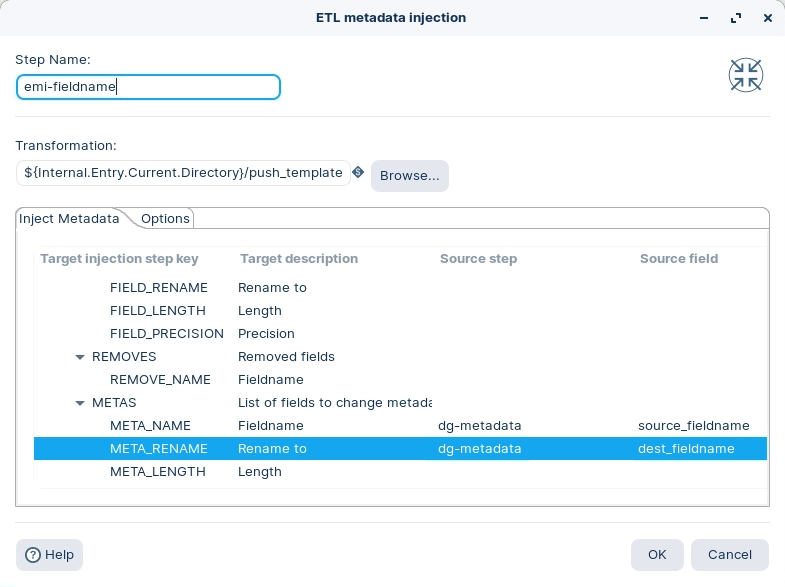
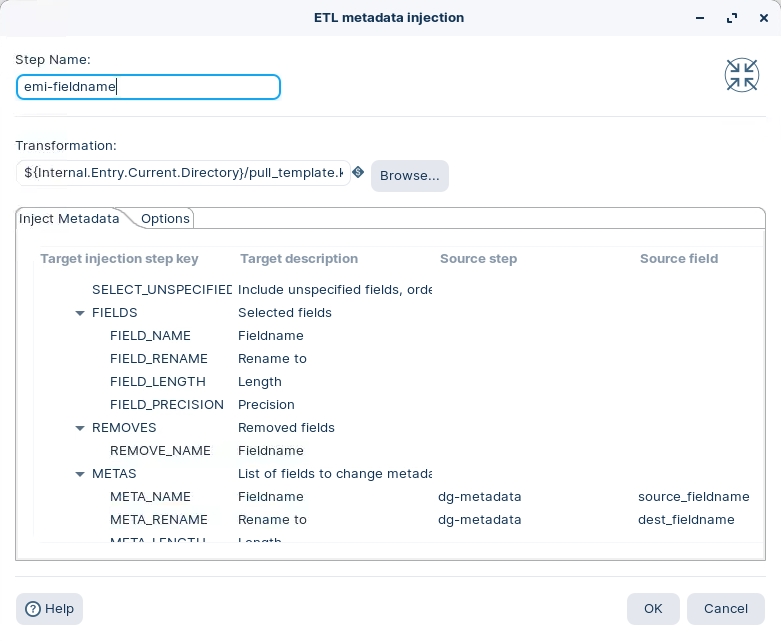
Double-click to set the properties as outlined below:
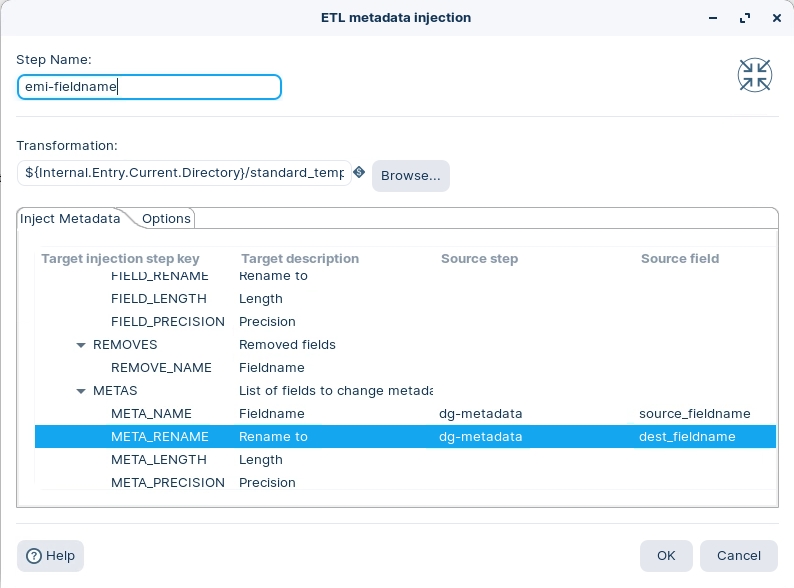
Click the Browse button to locate the Metadata Injection Template:
Notice the Inject Metadata tab:
These options define the ‘metadata rules’ for each step in the template. In this example, the Select values step will change the ‘source_fieldname’ to ‘dest_fieldname’ in the meta tab option.
Save the Transformation as:
~/How-To--Metadata-Injection/Standard Metadata Injection/standard_mdi.ktr
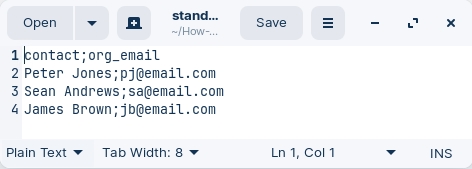
RUN the MDI Workflow
RUN standard_mdi.ktr:
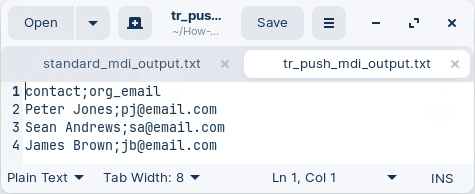
Open the file located at:
~/How-To--Metadata-Injection/Standard Metadata/standard_mdi_output.txt
In certain scenarios you will need to push/pull the rows to/from the template:
Push Metadata Injection.
Pull Metadata Injection.
Push – Pull Metadata Injection.
Streams the dataset to the template.
Template
Lets start with the template. The template is the workflow that utilizes the metadata injection.
Open the template:
~/How-To--Metadata-Injection/Push - Pull Metadata Injection/push mdi/push_template.ktr
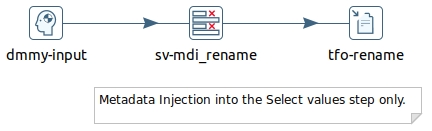
Dummy
Drag the Dummy step onto the canvas:
Rename: dmmy-input:
The rows are streamed / ‘pushed’ into the transformation template -dummy-input step.
Select Values
Drag the Select values step onto the canvas:
There’s nothing to configure as the ‘metadata rules’ will be defined in the ETL Metadata Injection step.
Text File Output
Drag and drop the Text file output step onto the canvas:
Double-click to set the properties as outlined below:
Just add the path to the output file. Notice the internal variables used to define the filename:
Filename: ${Internal.Entry.Current.Directory}/${Internal.Transformation.Name}_output
Save the Transformation as:
~/How-To--Metadata-Injection/Push - Pull Metadata Injection/push mdi/push_template.ktr
Metadata Injection
Here the result set from the Test data – input step, is pushed down into the Template.
Data Grid – Test data - input
Meta tab: on this tab, you can specify the field metadata (output specification) of the data
Data tab: This grid contains the data. Everything is entered in String format so make sure you use the correct format masks in the metadata tab.
Drag and drop the Data Grid step onto the canvas:
Double-click to set the properties as outlined below:
This is the data ingestion step. Could be a table, flat file, etc..
Data Grid
Drag and drop the Data Grid step onto the canvas:
Double-click to set the properties as outlined below:
ETL Metadata Injection
Drag and drop the ETL Metadata Injection step onto the canvas:
Double-click to set the properties as outlined below:
Filename: ${Internal.Entry.Current.Directory}/tr_push_template.ktr
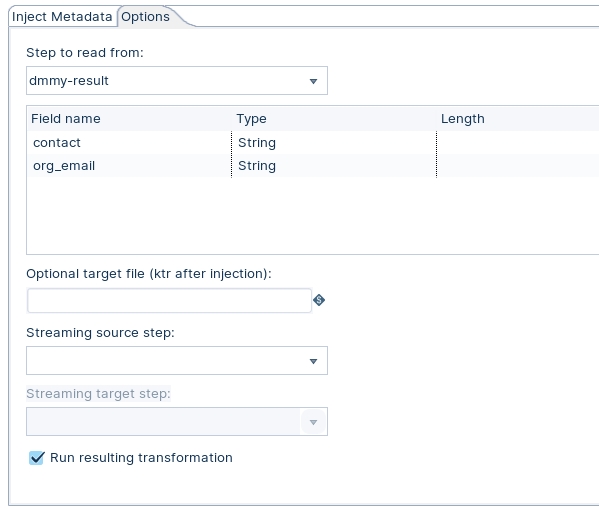
Click on the Options tab::
Ensure the following details are configured, as outlined below:
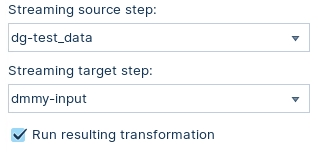
💡Ensure the 'Run resulting transformation' is checked.
The data is streamed – pushed - from the Test data -input step of the MDI workflow to the Input Stream step of the template.
Save the Transformation as:
~/How-To--Metadata-Injection/Push - Pull Metadata Injection/push mdi
RUN the MDI Workflow
1. RUN tr_push_mdi.ktr
2. Open the file located at:
~/How-To--Metadata-Injection/Push - Pull Metadata Injection/push mdi/push_mdi_output.txt
Streams the dataset from the template.
Start Pentaho Data Integration
cd
cd ~/Pentaho/design-tools/data-integration
sh spoon.sh
Template
Lets start with the template. The template is the workflow that utilizes the metadata injection.
Open the template:
~/How-To--Metadata-Injection/Push - Pull Metadata Injection/pull mdi/pull_template.ktr
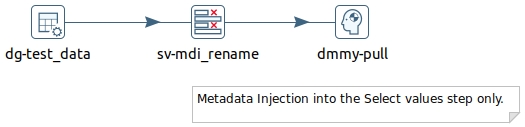
Data Grid – Test data - input
Meta tab: on this tab, you can specify the field metadata (output specification) of the data
Data tab: This grid contains the data. Everything is entered in String format so make sure you use the correct format masks in the metadata tab.
Drag and drop the Data Grid step onto the canvas.
Double-click to set the properties as outlined below:
This is the data ingestion step. Could be a table, flat file, etc..
Select Values
To configure the Select values step:
Drag the Select values step onto the canvas
There’s nothing to configure as the ‘metadata rules’ will be defined in the ETL Metadata Injection step.
Dummy
Drag the Dummy step onto the canvas.
Rename: dmmy-pull
The data is ‘pulled’ from the transformation template - dmmy-pull step. You will need to manually enter the fieldnames to are 'pulled'.
Metadata Injection
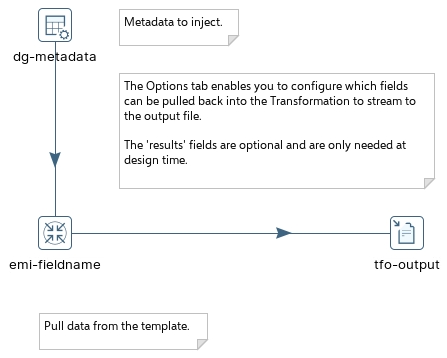
Data Grid
To configure the Data Grid step:
Drag and drop the Data Grid step onto the canvas.
Double-click to set the properties as outlined below:
Text File Output
Drag and drop the Text file output step onto the canvas.
Double-click to set the properties as outlined below:
ETL Metadata Injection
Drag and drop the ETL Metadata Injection step onto the canvas.
Double-click to set the properties as outlined below:
Filename: ${Internal.Entry.Current.Directory}/pull_template.ktr
Click on the Options tab.
Ensure the following details are configured, as outlined below:
💡Ensure the 'Run resulting transformation' is checked.
The data is streamed – pushed - from the Test data -input step of the MDI workflow to the Input Stream step of the template.
Save the Transformation as:
~/How-To--Metadata-Injection/Push - Pull Metadata Injection/pull mdi/pull_midi_output.txt
Last updated