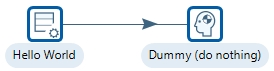
Pentaho Data Integration
InstallationBusiness AnalyticsCToolsData CatalogData QualityLLMs
  • Overview
    • Pentaho Data Integration ..
  • Data Integration
    • Getting Started
      • Configuring PDI UI
      • KETTLE Variables
    • Concepts & Terminolgy
      • Hello World
      • Logging
      • Error Handling
    • Data Sources
      • Flat Files
        • Text
          • Text File Input
          • Text File Output
        • Excel
          • Excel Writer
        • XML
          • Read XML
        • JSON
          • Read JSON
      • Databases
        • CRUID
          • Database Connections
          • Create DB
          • Read DB
          • Update DB
          • Insert / Update DB
          • Delete DB
        • SCDs
          • SCDs
      • Object Stores
        • MinIO
      • SMB
      • Big Data
        • Hadoop
          • Apache Hadoop
    • Enrich Data
      • Merge
        • Merge Streams
        • Merge Rows (diff)
      • Joins
        • Cross Join
        • Merge Join
        • Database Join
        • XML Join
      • Lookups
        • Database Lookups
      • Scripting
        • Formula
        • Modified JavaScript Value
        • User Defined Java Class
    • Enterprise Solution
      • Jobs
        • Job - Hello World
        • Backward Chaining
        • Parallel
      • Parameters & Variables
        • Parameters
        • Variables
      • Scalability
        • Run Configurations
        • Partition
      • Monitoring & Scheduling
        • Monitoring & Scheduling
      • Logging
        • Logging
      • Dockmaker
        • BA & DI Servers
      • Metadata Injection
        • MDI
    • Plugins
      • Hierarchical Data Type
  • Use Cases
    • Streaming Data
      • MQTT
        • Mosquitto
        • HiveMQ
      • AMQP
        • RabbitMQ
      • Kafka
        • Kafka
    • Machine Learning
      • Prerequiste Tasks
      • AutoML
      • Credit Card
    • RESTful API
    • Jenkins
    • GenAI
  • Reference
    • Page 1
Powered by GitBook
On this page
  1. Data Integration
  2. Concepts & Terminolgy

Hello World

Simple transformation to illustrate key concepts

PreviousConcepts & TerminolgyNextLogging

Last updated 1 month ago

Workshop - Hello World

In this workshop we're going to create the classic “Hello World” Transformation. The process will help define your own workflow for building data pipelines.

  • Learn how to create a new Transformation.

  • Add Transformation 'Steps'.

  • A 'Hop'.

  • And finally a 'Note'.


Create a new Transformation

Any one of these actions opens a new Transformation tab for you to begin designing your transformation.

  • By clicking File > New > Transformation

  • By using the CTRL-N hot key

Generate Rows

Generate rows outputs a specified number of rows. By default, the rows are empty; however, they can also contain several static fields. This step is used primarily for testing purposes. It may be useful for generating a fixed number of rows, for example, if you require exactly 12 rows for 12 months.

Sometimes you may use Generate Rows to generate one row that is an initiating point for your transformation.

  1. To add the Generate Rows step, expand the ‘Input’ category in the Design tab, and drag the step onto the canvas.

💡Alternatively, enter ‘Generate Rows’ into the search bar.

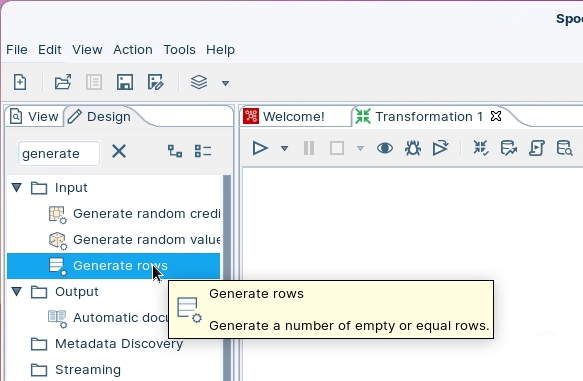
  1. Double-click on the Generate Rows to open step properties.

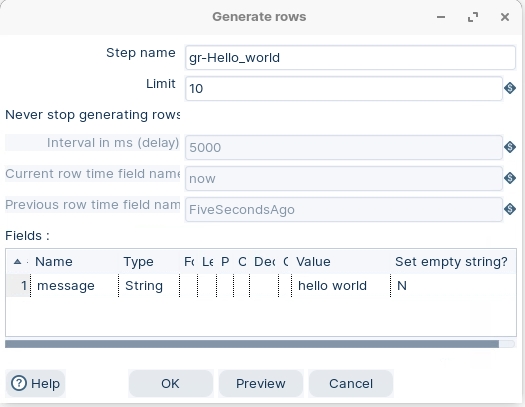
Ensure the following details are configured:

Step name

gr_hello-world

Limit

10

Name

message

Type

string

Value

hello world

Before we close this dialog and continue creating the transformation, let’s make certain the Step generates the data we expect.

  1. Click Preview button. The ‘Enter preview size’ dialog is displayed.

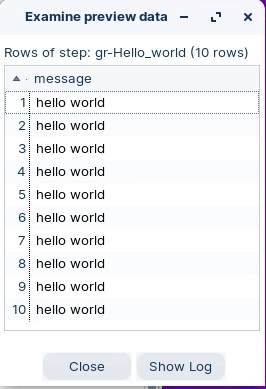
  1. In the ‘Enter preview size’ dialog, click the [OK] button.

  2. Verify 10 rows of data with the message you entered is displayed, and then click the [OK] button to close the ‘Examine preview data’ dialog.

  3. Click OK button to close the ‘Generate Rows’ dialog.

Dummy

The Dummy step does process records. Its primary function is to be a placeholder for testing purposes. For example, to have a transformation, you need at least two steps connected to each other.

  1. To add the Dummy step, expand the ‘Flow’ category in the Design tab, and drag the Dummy step onto the canvas:

Hops

Hops are the I/O buffer in your data stream.

Steps may be configured with specific I/O parameters to meet requirements.

Create a Hop

  1. Click on the hello world step.

  2. Hold down the Shift key.

  3. Drag and drop the hop onto the Dummy step.

  4. Release the Shift key.


Add a Note

  1. Right mouse click anywhere on Spoon canvas.

  2. Select: New Note.


Transformation Properties

To view the transformation properties:

  1. Double-click anywhere on the canvas.

💡Optionally, enter a more detailed description in the ‘Extended description’ property.

RUN the Transformation

This final part of the creating a transformation, executed locally.

  1. In Spoon, select Action > Run This Transformation.

Or Click on the Run button in the toolbar ..

The Execute a transformation window appears. You can run a transformation locally, remotely, or in a clustered environment. For the purposes of this exercise, keep the default as Local Execution.

  1. Click Run icon and select Run Options.

In the Run Options panel you can set:

  • the run configuration - the server pattern (single server or across a cluster)

  • set the logging level

  • save the Transformation locally.

The transformation executes.

A green tick confirms the transformation's execution, but doesn't guarantee the success of the underlying operations.


Execution Results

The Execution Results section of the window contains several different tabs that help you to see how the transformation executed, pinpoint errors, and monitor performance.

Logging tab displays logging information for each of the steps in the transformation.

Step Metrics tab provides statistics for each step in your transformation including how many records were read, written, caused an error, processing speed (rows per second) and more. This tab also indicates whether an error occurred in a transformation step.

Metrics will help identify any back pressure on the Steps. In this example the transformation took 30ms to execute. Notice that the steps gr_hello-world & Dummy are initialized at the same time. Each step is executed in parallel, i.e. in their own thread, independent of each other.

Preview tab displays the records.


Viewing the Transformation structure

If you click the View icon in the upper left corner of the screen, the tree will change to show the structure of the transformation currently being edited.

➡️ Next:

➡️ Next:

➡️ Next:

Configure the Dummy Step
Hops & Annotations
Finally RUN the transformation
hello world.tr
generate rows
Preview rows
dummy step
Notes
Notes - Style
transformation properties
Run Options
Automatically save transformation
Green ticks indicate successful execution
Logging
Step Metrics
Metrics
Preview data
View