Pentaho Data Integration
InstallationBusiness AnalyticsCToolsData CatalogData QualityLLMs
  • Overview
    • Pentaho Data Integration ..
  • Data Integration
    • Getting Started
      • Configuring PDI UI
      • KETTLE Variables
    • Concepts & Terminolgy
      • Hello World
      • Logging
      • Error Handling
    • Data Sources
      • Flat Files
        • Text
          • Text File Input
          • Text File Output
        • Excel
          • Excel Writer
        • XML
          • Read XML
        • JSON
          • Read JSON
      • Databases
        • CRUID
          • Database Connections
          • Create DB
          • Read DB
          • Update DB
          • Insert / Update DB
          • Delete DB
        • SCDs
          • SCDs
      • Object Stores
        • MinIO
      • SMB
      • Big Data
        • Hadoop
          • Apache Hadoop
    • Enrich Data
      • Merge
        • Merge Streams
        • Merge Rows (diff)
      • Joins
        • Cross Join
        • Merge Join
        • Database Join
        • XML Join
      • Lookups
        • Database Lookups
      • Scripting
        • Formula
        • Modified JavaScript Value
        • User Defined Java Class
    • Enterprise Solution
      • Jobs
        • Job - Hello World
        • Backward Chaining
        • Parallel
      • Parameters & Variables
        • Parameters
        • Variables
      • Scalability
        • Run Configurations
        • Partition
      • Monitoring & Scheduling
        • Monitoring & Scheduling
      • Logging
        • Logging
      • Dockmaker
        • BA & DI Servers
      • Metadata Injection
        • MDI
    • Plugins
      • Hierarchical Data Type
  • Use Cases
    • Streaming Data
      • MQTT
        • Mosquitto
        • HiveMQ
      • AMQP
        • RabbitMQ
      • Kafka
        • Kafka
    • Machine Learning
      • Prerequiste Tasks
      • AutoML
      • Credit Card
    • RESTful API
    • Jenkins
    • GenAI
  • Reference
    • Page 1
Powered by GitBook
On this page
  1. Data Integration
  2. Data Sources
  3. Databases
  4. CRUID

Read DB

PreviousCreate DBNextUpdate DB

Last updated 28 days ago

Workshop - Read DB

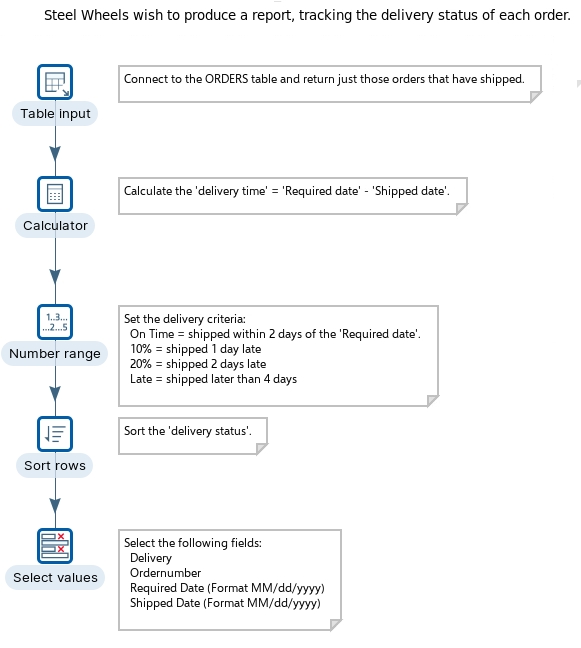
The warehouse manager at Steel Wheels requires a report highlighting the status of the ORDERS shipped.

In this guided Lab, you will:

• Connect to a database

• Modify SQL statement

• Configure the following steps:

Table Input

Calculator

Ranges

Sort Rows


Create a new Transformation

Any one of these actions opens a new Transformation tab for you to begin designing your transformation.

  • By clicking File > New > Transformation

  • By using the CTRL-N hot key
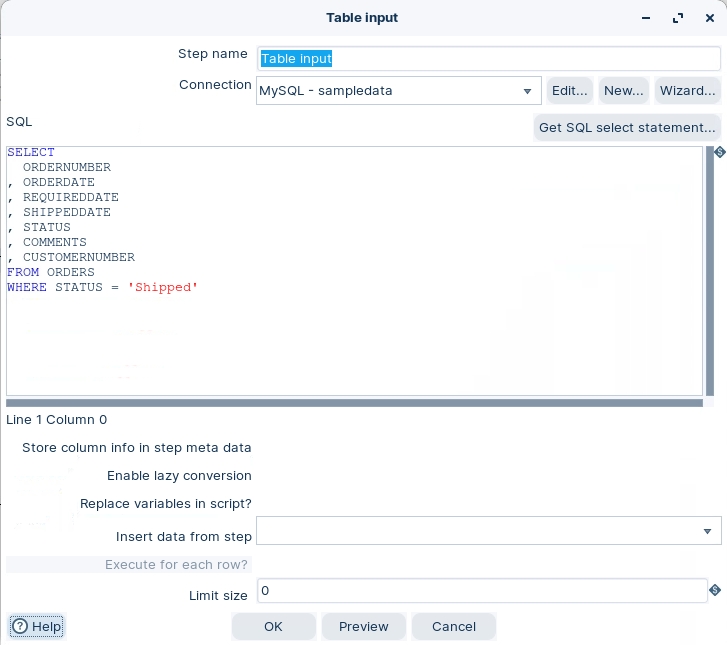
Table input

This step is used to read information from a database, using a connection and SQL. Basic SQL statements can be generated automatically by clicking Get SQL select statement.

Connects to the ORDERS data table and extracts the required dataset where the status of the order is ‘Shipped’.

  1. Drag the Table Input step onto the canvas.

  2. Open the Table Input properties dialog box. Ensure the following details are configured, as outlined below:

  1. Preview and Click OK.

Calculator

This calculator step provides you with predefined functions that can be executed on input field values.

The execution speed of the Calculator is far better than the speed provided by custom scripts (JavaScript).

Besides the arguments (Field A, Field B and Field C) you must also specify the return type of the function. You can also choose to remove the field from the result (output) after all values are calculated; this is useful for removing temporary values.

  1. Drag the Calculator step onto the canvas.

  2. Open the Calculator properties dialog box.

  3. Ensure the following details are configured, as outlined below:

  1. Click OK.

Calculates order_time between when the order is required from when it was shipped.

Number range

The Number Range step in Pentaho Data Integration (PDI) maps numeric values to descriptive categories or ranges. This step takes numbers from an input field and assigns text descriptions based on which predefined range they fall into.

To use this step, you add it to your transformation, specify the input numeric field and output text field, then define your ranges with lower and upper bounds along with the corresponding description for each range. For example, you might categorize ages into groups like "Under 18," "18-24," "25-34," and so on.

This functionality is particularly valuable for data preparation, reporting, and visualization as it converts continuous numerical data into discrete, meaningful categories that are easier to analyze and understand. Common applications include creating age brackets, income ranges, temperature classifications, or performance tiers.

  1. Drag the Number range step onto the canvas.

  2. Open the Number ranges properties dialog box.

  3. Ensure the following details are configured, as outlined below:

Sets the actions for ‘order_time’ in the output field ‘order_status’:

On Time

If the order has been Shipped within 2 days or more before the ORDERDATE.

10%

If the order has been Shipped more than 3 days after the ORDERDATE.

20%

If the order has been shipped more than 4 days after the ORDERDATE.

Action

If the order has been shipped later than 5 days after the ORDERDATE.

Sort rows

The Sort rows step sorts rows based on the fields you specify and on whether they should be sorted in ascending or descending order.

  • Kettle must sort rows using temporary files when the number of rows exceeds the specified sort size (default 1 million rows). When you get an out of memory exception (OOME), you need to lower this size of change your available memory.

  • When you use multiple copies of the step in parallel (on the local JVM with "Change number of copies to start" or in a clustered environment using Carte) each of the sorted blocks need to be merged together to ensure the proper sort sequence. This can be done, be adding the Sorted Merge step afterwards (on the local JVM without multiple copies to start or in the cluster on the master).

  1. Drag the Sort Rows step onto the canvas.

  2. Open the Sort Rows properties dialog box.

  3. Ensure the following details are configured, as outlined below:

  1. Click OK.

Before you can do any stream operations, its best practice to Sort the rows.

Select values

The Select Values step is useful for selecting, removing, renaming, changing data types and configuring the length and precision of the fields on the stream. These operations are organized into different categories:

Select and Alter

Specify the exact order and name in which the fields should be placed in the output rows.

Remove

Specify the fields that should be removed from the output rows.

Meta-data

Change the name, type, length and precision (the metadata) of one or more fields.

  1. Drag the Select values step onto the canvas.

  2. Open the Select values properties dialog box. Ensure the following details are configured, as outlined below:

  1. Click OK.

Formats the REQUIREDDATE and SHIPPEDDATE

RUN

This transformation introduces several new steps that can help manipulate the data with predefined functions.

  1. Click the Run button in the Canvas Toolbar.

  2. Click the Preview Data tab for Select values..

Read from a database
Table input
Calculate diff days
Number range
Sort rows
Set data type
Status of 'shipped' orders